Tuesday, August 26, 2014

2014 week 15


New this week:

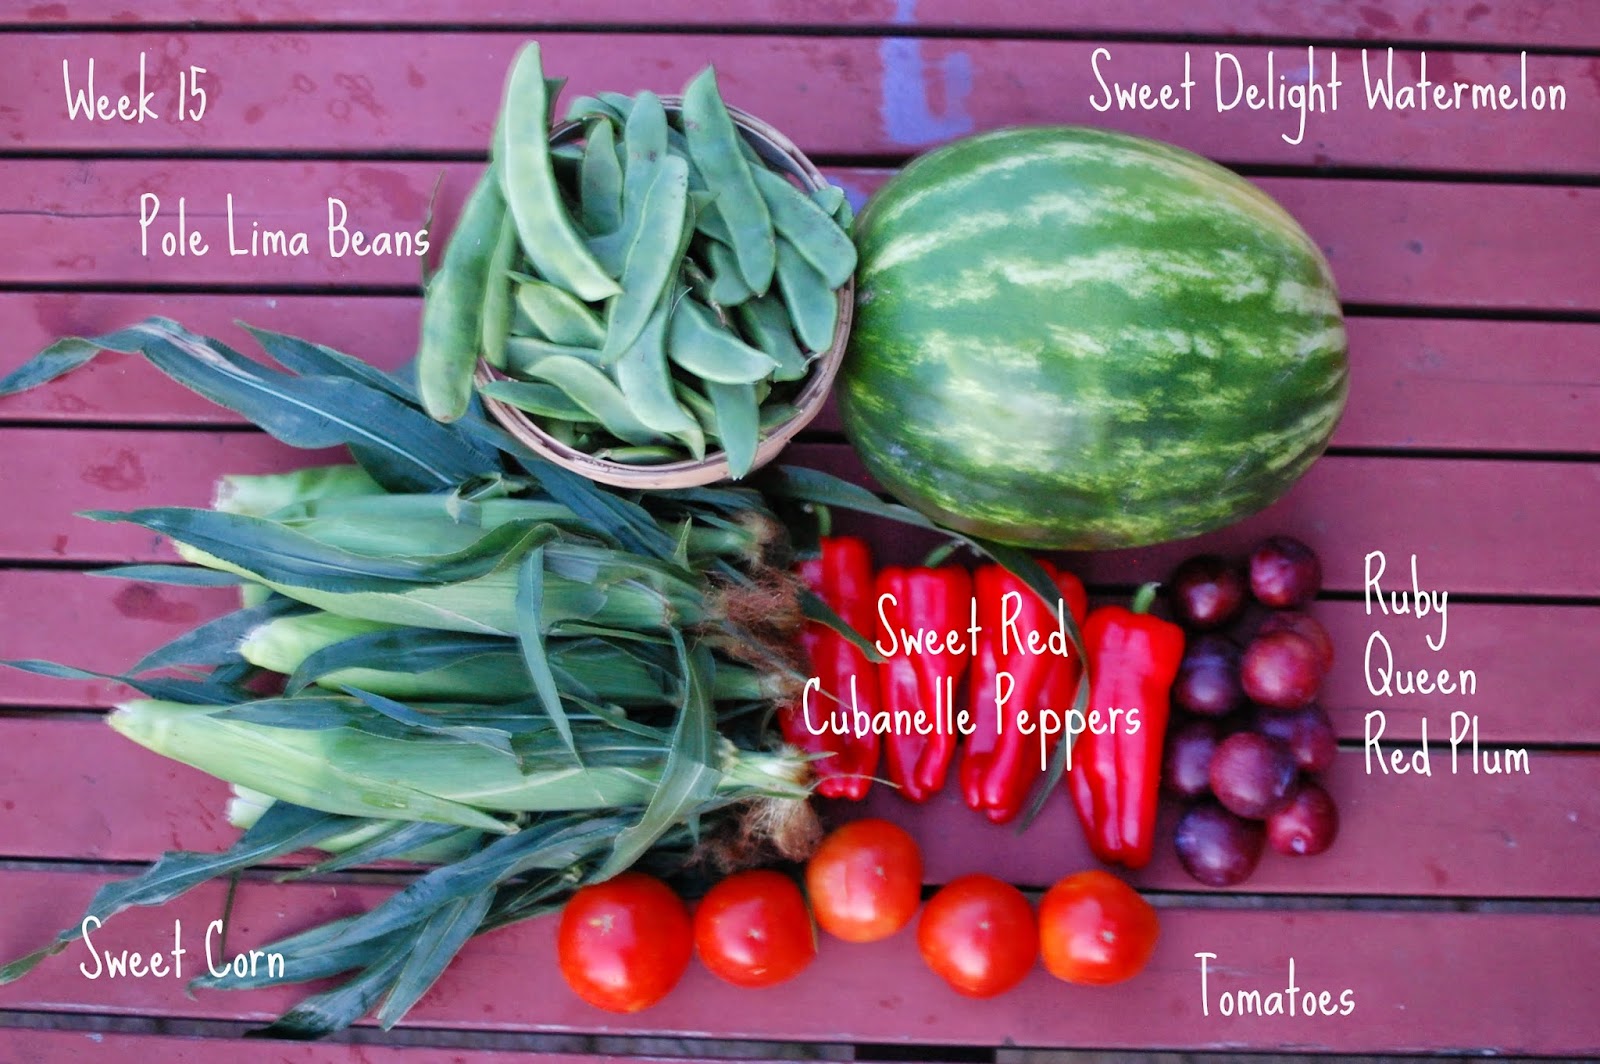
Pole Lima Beans from LaRosa's in Woodstown, NJ are included in your share this week.  Check out their website dedicated to Pole Lima Beans.

--To cook lima beans first you must shell them. Open the shell and pluck out the beans.  Put the shelled beans in a pot add water to cover.  Add a couple slabs of butter, salt and pepper to the pot.  Bring to a boil. Cook uncovered for 20 minutes or until tender, adding more water if necessary.

Lima beans are delicious served along with sweet corn.  Succotash, a traditional thanksgiving dish, is boiled lima beans and corn. YUM.

Ruby Queen Red Plum from Circle M Farm in Quinton, NJ. We had these last year and love them so much. So glad to be able to share them again this year.


Last year was the worst year we have ever had with watermelon, 16 inches of rain in June created extreme flooding, which then lead to fungal diseases like we have never seen.  Our  first field was an unprecedented complete loss.  It made us feel like we don't know how to farm.  This year is REDEMPTION YEAR! The watermelons are beautiful, plentiful, and delicious! Woohoo!

Tuesday, August 12, 2014

2014 week 13

Week 13 Full Share

New this week: PEACHES from Circle M Farm 88 Sandy Ridge Road Salem, NJ.
Click here to see their website

The peaches need a day or two on the counter to ripen.

Woohoo! The Red Cubanelle Peppers are finally here.  They are one of my favorites, so sweet and delicious!

Here is a link to my stuffed pepper recipe.


Stuffed Peppers the Buzby way


This originally came to me as a Jalapeño popper recipe.  Recently we have started filling cubanelles with it.  Both ways are amazing! The combination of pepper and cheese is divine.

This is what my father-in-law, Farmer Andy has to say about Stuffed Cubanelles, "I could eat about 10 feet of the that!"  

The filling:
One 8 oz block of cream cheese
2 cups shredded cheddar cheese
1/2 cup bread crumbs (omit to make gluten free)
dash of chili powder
dash of garlic powder.

Mix the above and use to fill all kinds of peppers.  For cubanelles bake at 400 until cheese is melty and the peppers are getting some browned edges, about 20-30 minutes. Feel free to use what ever cheese you have, switch out the cheddar for monetary, YUM!

Farmer Andy prefers this filling in red cubanelle peppers.  I cut them in half length wise and take the seeds out, and then smoosh some filling in.  

I enjoy using the cheese mixture to make my own jalapeño poppers. I bake the jalapeños at  300 for little bit longer, 40-50 minutes.  

It is amazing in any hot pepper!

Enjoy!

Wednesday, August 6, 2014

Tomato Pie Recipe


Tomato, tomato, tomato.

Its just about that time in the summer when the tomatoes start to really pile up on the windowsill and counters in my house.  I've had the tomato grilled cheese, the BLT, the bruschetta, the tomato sandwich, caprese salad, and now I'm looking for a different, delicious way to eat up some of these tomatoes.  

I found the answer in Tomato Pie!


First for the tomato pie, you need the pie crust.  You are welcome to make one from scratch, but I totally used a refrigerated store bought crust. Preheat the oven to 350 and pre-bake your crust for 10-12 minutes, until lightly browned.  I recommend using dried beans or something to help hold the edges up while pre-baking the crust. 
Now the tomatoes.  You can use any tomato you have.  I just used these gorgeous Big Beef.  I think the pie would be lovely with some colorful heirlooms too.

First cut the tomato horizontally and squeeze to remove the excess juice.  It is important to squeeze the tomatoes or your pie will be watery. Then give the tomatoes a rough chop.  You need 3 cups of chopped tomatoes.

Next chop 1/2 onion and chop some basil, about 1/4 cup.
In a medium bowl, mix together 2 cups grated cheese ( I used mozzarella and parmesan), 3/4 cup mayonnaise, Tabasco, a sprinkle of salt and pepper.
In the pre-baked pie shell sprinkle in the chopped onion.
Spread the chopped tomatoes over the onion and sprinkle with basil.
Spread the cheese mixture over the tomatoes
Place in oven and bake 30-40 minutes until bubbly and browned.

Holy Cow! So good!


Tomato Pie Recipe

1 9inch pie crust
3-4 tomatoes, cut in half squeezed to remove excess juice, and then roughly chopped (3 cups)
1/2 onion, chopped
1/4 cup chopped basil
2 cups cheese, I combined mozzarella and a little parmesan, but any cheese would work.  Cheddar and 
                       Monterey would be goooood!
3/4 cup mayonaise 
1 tsp tabasco sauce

Preheat oven to 350. Pre-bake pie crust 10-12 minutes until lightly browned.  Sprinkle the bottom of the pie crust with chopped onion. Top with chopped tomatoes and sprinkle with basil. In a medium bowl mix the cheese, mayo, tabasco sauce, salt, and pepper.  Spread over the tomatoes.  Bake until bubbly and browned. 30-40 minutes!


Tuesday, August 5, 2014

2014 week 12

It's August.  August at the farm means:

  • Weeds. At this point it seems that the weeds have gotten out of control and to far ahead for us to catch up.
  • Farmer Andy is finally finished planting sweet corn every four days.  
  • Mowing corn. Pop-pop Wilbur spends many an hour mowing the corn stalks that have already been harvested.
  • Fruit flies seem to be annoying me more abundantly.
  • Exhaustion.  We are just so tired. 


Link to my easy Eggplant Pasta recipe.

Link to my favorite way to serve eggplant. Eggplant Ricotta Bake.

Monday, July 21, 2014

Basil Pesto. Soooo good!

What to do with that large amount of basil? My answer. Pesto. Period.
 Let's make the pesto.
 Add 3/4 cup of basil leaves to the food processor bowl.
 Add 1/2 cup parmesan cheese.
 Add 3 Tablespoons pine nuts (you could use walnuts, instead)
 Add 2 cloves garlic.
 Put the lid on and turn on the food processor.  While it's on drizzle in 1/3 cup of olive oil.
 Beautiful! Now if you stop here you have Pesto.  Yum.  You could add this straight to drained pasta and it would be delicious or to take it to another level.
 Heat 1/2 cup of cream and 2 tablespoons of butter in a saucepan and add the pesto.
 Stir in an extra 1/4 cup of parmesan cheese.
 Put your drained pasta in a bowl. 
 Pour over the pesto cream sauce.

 Add some diced tomatoes to the hot pasta and warm pesto sauce.
 Stir.
Dig into this wonderfulness!


Basil Pesto Cream Sauce
3/4 cup fresh basil leaves
3/4 cup grated Parmesan cheese
3 tablespoons pine nuts or walnuts
2 garlic cloves, peeled
1/3 cup extra virgin olive oil
1/2 cup cream
2 tablespoons butter
12 oz pasta, such as fusilli, cooked al dente
2 large tomatoes, diced

To make the pesto: Add the basil, 1/2 cup parmesan, pine nuts, garlic to a food processor.  Turn on the machine and slowly drizzle in the olive oil to make a nice puree. Season with salt and pepper.

To make the cream sauce: Heat the heavy cream in a saucepan and drop in the butter. Then pour the pesto right in. Stir together and just simmer for a few minutes.  At the end add the remaining 1/4 cup Parmesan.

Put the drained pasta in a large serving bowl. Pour on the pesto cream sauce. Then add the diced tomatoes. Toss together and serve right away.

Enjoy!


Thursday, July 3, 2014

Meet your farmer - Part 2

A Continuation of Get to Know your Farmer Series: 
Farmer Eric Buzby

I was born to a couple of adventurous start-up farmers. My parents brought me home from the hospital to a condemned house. I remember, when I was maybe three or four, pushing my tricycle to the top of the kitchen floor, hopping on and squealing with delight as I coasted down hill to the other side of the kitchen. The floor was sinking. That section of the house had no foundation and every year Dad had to trim the door a little smaller to fit the shrinking doorframe. We were pretty much poor, but I never knew it, never cared. I was happy to be with my parents. They were both there all the time. I never remember either of them going away, ever. Both of them worked on the farm, we lived on the farm, and we really didn't have much reason, or financial ability to travel much. We were just there. Together. I have two younger brothers who really were my best friends and playmates. We rode bikes, played in the woods, ran barefoot down the lane. Simple living, really.

Andy and Eric playing tractors.
I had my first taste of farming at the age of 10. My dad granted me the use of a 3/4 acre field adjacent to our house. He advised me to grow watermelon. I started the transplants from seed. He did the work that I was unable to do. Such as plowing, laying out the irrigation, forming beds, laying the plastic, transplanting the plants, and irrigating.......... in retrospect, he basically did most of the work. I was responsible for three very important jobs: hoeing the weeds, picking them, and... (here comes the good part) selling them. I set up a roadside stand in front of my friends house on Kings Highway. By the end of the summer I had sold $800 of watermelon. I now considered myself independently wealthy. I was able to buy my own (well used) dirt bike for $475 and still had enough left over to fix it up. This was an important lesson for me about the value of farming. I now know that it's not as easy when you have to do ALL of the work, not just pick and sell, but still, it's a thrill to know that what we grow is valuable to others. Our friends and neighbors are willing, even glad to pay for quality fresh produce.

As a high school senior, I found myself confronted with the big decision. Where to go to college. Whether I should even go to college. School had never been a joy to me. I preferred to be outside. However, I was strong in math and science and accordingly was accepted by the University of Delaware and Rutgers as a Mechanical Engineering student. After being accepted, I was struggling to feel comfortable with the idea of actually working as an engineer. Machinery had always enticed me, but the thought of hours in an office made my palms sweat.

There was another factor at play here. My girlfriend of three years was a serious cutie. Smart (top of our class), graceful, a farm girl herself. A real keeper. As I thought about starting a family with her, I harkened back to my early years, running barefoot down the lane, seeing my parents work and having access to them all day, everyday. I wanted my children to experience that. With farming in mind, I switched my major to Bioresources Engineering. My cute girlfriend agreed to marry and we had our wedding my Junior year. Was it difficult being married in college? Not as difficult as being apart from this girl another day. We sure stick together to this day and always.

Wedding Day
High School Homecoming


My motivation for farming comes down to two things: family and meaningful work. The seed of family togetherness was planted in me as a child and grows strong within me today. To know that we're together in this makes all the difference. I wouldn't .... couldn't do it alone. And as far as meaningful work, people have three basic needs right? Food. Shelter. Clothing. Food is first on the list! It's so basic. Everyone needs it. I have noticed how some people are getting upset these days about certain types of food and how they are produced. I asked myself why are they so upset about this? and I began to realize more than ever that food is more than just a basic need. It's deeply personal. You are what you eat. Knowing this, I feel deeply honored to have the privilege of growing food. It's a responsibility I don't take lightly. I'm glad to be a part of this great, time-honored profession of farming and I cherish each day I can do it.

Tuesday, July 1, 2014

2014 week 7


June comes to a close and July marches in.  This week we transplanted the pumpkins.  This basically wraps up planting season for us! Now begins the intense harvest season.  The next eight weeks will be hot, intense, laborious, and so exciting.  We will be sweating, we will be tired, and we will sleep well with the satisfaction of feeding thousands of people everyday.

New to the share this week:
Sweet Corn-  For the best flavor eat your corn as soon as possible.  I mean the same day you pick up.  If you can.

Although, if you can't eat your corn that night leave the husk on and store it in your refrigerator.  Refrigeration really helps to slow down the loss of the corns sweetness.  We have had many customers tell us that they leave their unshucked corn in the fridge for up to 7 days and it still tastes great!
To prepare your corn, husk and wash the corn.  Bring a big pot of water to boil.  Toss the ears in, cook for about 5 minutes.
What I normally end up doing is tossing the ears in the boiling water, bring it back to a boil, and then shutting the burner off.  Then I just let the corn sit in the water until we are ready to eat.  This way the corn stays warm until I need it.


Corn is going to be a regular in the share for July and August.  If you ever have a week when you can't eat all the corn or it just isn't fitting into your meal plan. Freeze it!  It is so easy. Just cut the corn off the cob, stick it in a freezer bag, and toss it in the freezer. Done! If you're feeling extra ambitious, you can date the bag. Once you get used to eating this frozen corn, you will be ruined for all other frozen corn.


Blueberries- these beauties are from Hammonton, NJ -- known as the blueberry capital of the world!
How will you use your blueberries: pancakes, muffins, cobblers, fruit salad, right out of the container?

Tuesday, June 24, 2014

2014 Week 6


New to the share this week:
Rainbow Carrots and String Beans

Rainbow carrots are just so fun, all the different colors! To store, cut the tops off and store in a plastic bag.  Use them anyway you would your normal carrots.  Here is a link to a roasted carrot recipe.

This week marked the summer solstice.  If you couldn't tell by the extremely long day length then you might start to think summer when you see the CSA share this week.


Wednesday, June 18, 2014

2014 week 5

My apologies.  I didn't take a photo of the share yesterday.

New to the share this week CABBAGE:
I love cabbage! I love coleslaw!  I love coleslaw on top of pulled pork sandwich, yumyum!

Here is a link to a recipe for Cabbage, Kohlrabi, Broccoli Slaw with Quinoa.

Are you on Pinterest? I am I am trying to pin lots of produce recipes.  Hop on over and follow me, especially my CSA recipes.
Follow us on instagram "buzbyfarm"

BROCCOLI is in the share this week too!  

ZUCCHINI - A link to the Best Stuffed Zucchini Ever

SPRING ONIONS - With a variety name "CANDY" these sweet onions are delicious and so versatile.  Keep in the fridge and use within a week.


Tuesday, June 10, 2014

2014 week 4


Kohlrabi--  I know this is a weird one.  But trust me it is good and easy to use.
--Here is a link to make the famous Kohlrabi Ham Bake
--Here is a link to a post I wrote on Kohlrabi

Yellow Squash--
--Here is a link to my favorite Yellow Squash Casserole
--Yellow Squash is also delicious grilled.  Link to recipe.

Kirby pickles-- you can use these just like cucumbers, but they are especially great for pickling.
--here is a link to a great refrigerator pickle recipe

Swiss Chard--The secret to Swiss chard is understanding that it is really two vegetables in one.  The sturdy stems that come in all kinds of colors which take a little time to cook and soften, and the leaves which wilt very quickly.  In my mind I equate Swiss chard very closely to spinach. You can exchange chard leaves in just about any recipe that calls for spinach. And it will turn out wonderfully.  I put Swiss chard in my Minestrone Soup. . . YUM-O!

All of us here at Buzby Farm would like to thank all of you who attend the Spring Open House.  We had a great time getting to know you and showing you around the farm.

Farmer Andy and Eric are passionate about farming and love to share that with you during the tour.

We enjoyed perfect spring weather.  Thank you for allowing us to be your farmers!

Tuesday, June 3, 2014

2014 week 3

half share gets either romaine or bok choy

June is finally here! And so is the spinach and kale!

Click here and here  and here for previous posts on spinach.

Lacinato Kale also known as Dinosaur Kale is extremely nutritious.  I enjoy kale in my morning green smoothie.  Click here for a link to a salad recipe that is in my menu plan for the week.

We are so excited to have garlic scapes in the share this week from our friends and neighbors Obis One.   Garlic scapes are the tender stem found on a garlic plant.  Use your garlic scapes raw in salads and they will have a hot peppery flavor. Cooked garlic scapes will have a mellow, sweeter flavor.
--Here is a link to a recipe using garlic scapes and collards
--Here is a link to a garlic scape salad dressing

Here is a link for turnip recipes. These recipes were written with traditional purple top turnips in mind, which are normally larger, you may need to use more Hakurei for the recipe.

CSA field
 
We are working like crazy to get the farm spruced up for our CSA Spring Open House!

Tuesday, May 27, 2014

2014 week 2

Half shares had either broccoli rate or collard greens and hakurei turnips or radishes.
I am so excited to be offering this produce to you in this weeks share.

Broccoli Rabe is a bitter green, very similar to mustard greens.  I love broccoli rabe cooked with lots of garlic!  I recommend blanching the rabe in boiling water to take the edge off the bitterness first then sauteing with olive oil and garlic.  Here is a link to a recipe.

Collard Greens - your body will love you for eating these healthy greens.  Check out this recipe for collards.

Click here for what to do with Arugula.

Hakurei Turnips - They are delicious raw added to salads or slaws or just sprinkled with salt.  When cooked, they develop a buttery flavor and when roasted at high temperatures, their sweetness increases.
Don't get rid of the tops! Sauté with garlic in olive oil--tasty or add to your morning smoothy for a vitamin boost.


We are so, so thankful that we didn't receive any hail in last weeks storm.  And our thoughts are with our fellow farmers that saw great loss.   This farming business is crazy, risky, and at times just plain hard. 


Simple Arugula Recipes

written by Angela Livesay

I only ever use arugula for salads (and the occasional sandwich) because it has a great peppery bite that pairs really well with any number of different flavors and textures. The most simple, base recipe that I use for it is Arugula Salad with Lemon Vinaigrette. From that point, it's just a matter of choosing your toppings. Because this salad is bright and peppery, I like to top it with something creamy (like a cheese or avocado) and something crunchy (for texture variety).

Arugula Salad with Lemon Vinaigrette
For one full-share salad (Half-shares would...well...halve this):

-Arugula (washed and dried)

Lemon Vinaigrette:
-Juice of one large lemon (about 3-4 tablespoons depending on the lemon)
-1 tsp of honey
-1/4 tsp of salt (you can add more to taste later)
-1/4-1/3 cup extra virgin olive oil
-Cracked black pepper, to taste

-In a large salad bowl, start making the vinaigrette. Whisk the lemon juice, honey, and salt until combined. Slowly drizzle in the olive oil (start with 1/4 cup). Check for taste at this point and add more oil or salt if necessary).

-Add the arugula to the bowl *only* when you're right about to serve the salad.

Here are my favorite ways to top this salad:

Arugula Salad with...
-Shaved parmesan and toasted pine nuts
-Sliced strawberries, crumbled goat cheese, and toasted pecans
-Sliced avocadoes and crispy oven roasted chickpeas
-Sliced apples and brie cheese (or crumbled gorgonzola)


Quinoa Salad with Arugula

Ingredients:
-1 ½ cups quinoa, red or black (whatever color you want, but I used the Trader Joe’s red)
-3 cups water
-2T +1/4 cup extra virgin olive oil
-1 lb asparagus chopped into 1” pieces or 1lb yellow/green squash, sliced into quarters (any green vegetable would work here; use what’s in season)
-Sea salt
-1 clove garlic
-1/4 cup fresh lemon juice
-1 small cucumber, sliced into quarters
-5 green onion, sliced (or 1 red onion)
-1/4 cup basil, minced
-1/4 cup mint, minced
-1/2 cup feta, crumbled
-1 small head of arugula, washed and dried (about 2-3 cups)

Instructions:
-Rinse quinoa well. Bring water to a boil in a saucepan and add the rinsed quinoa. Bring water back to a boil; cover with a lid and cook on low heat for 25 minutes. Let quinoa sit for 5 minutes before fluffing with a fork. Transfer quinoa to a large bowl and set aside.

-In a large pan, fry  asparagus OR squash slices in 2 T of olive oil until tender-crisp, about 2-3 minutes. Let cool.
-To make the dressing, mash garlic with a pinch of salt to make a paste. Whisk in the lemon juice and let sit for 10 minutes. Slowly whisk in the ¼ cup of olive oil, basil, mint, salt, and pepper. Add to quinoa and zucchini mixture. Fold in the feta, sliced green onion, and arugula and then serve!


Tuesday, May 20, 2014

2014 week 1

After what seemed like too long, the CSA has finally started.

And what a great day to start.

Click here for what to do with radishes.

Click here for what to do with escarole.

Click here for a recipe with Bok Choy.

Click here for a step by step on how to prep your greens. This post speaks specifically about spinach, but it applies to all greens (Red Romaine, Bok Choy, Escarole). *It is very important to do this to make the lettuce last and stay crisp.*

We have never delayed the start of CSA two weeks, like we did this year. It was a hard thing to do. The anticipation was killing us. Now, in retrospect, it was the right decision. We are so glad to have this variety of crops to share on the first week.

The asparagus is from our neighbors, the Catalanos.  Everything else is from our farm.

The strawberries are delicious, but few. Strawberries this year will be underwhelming. It just isn't shaping up to be a good strawberry year. The winter was hard on them, spring was so late, and we had some problems with weed control. All this to say, you may see strawberries in pints more often than quarts this year.

It was so great to see so many returning members and meet you new members today.

Bok Choy. . . It's delicicous!

Many of you were asking what to do with your Bok Choy.  Here is my favorite way to prepare it.  **Bonus it is quick and easy.

This is not an exact recipe, sorry to my peeps who like specific instructions.

To prep the bok choy cut the stalks from the leaves.  (The stalks take longer to cook).  Chop the stalks into large bite sized pieces.  Then chop the leaves into 1 inch pieces.  I also added some sliced red onion, but you could use sweet onion or green onions too.

Heat olive oil in saute pan on high.  Make sure it is good and hot then add the stalks and onion and saute for 1-2 minutes.  Then add in the leaves.  Like spinach, the leaves will wilt.  Then I added a sprinkle of red pepper flakes, a couple drops of toasted sesame oil and a few splashes of soy sauce.  Stir and cook just until greens have wilted.  It will only take1-2 more minutes.  YUM!

Word to the wise: I overdid it a little on the soy sauce,  that stuff is so potent, it only takes a little.

Enjoy!

Sunday, May 18, 2014

Meet Your Farmer: Part 1

One of THE best parts of being a member of a CSA is getting to know your farmer.

So over the next couple weeks I will take the time to introduce you to our farming family.


First up: Me!

Hi I'm Martie and I am the voice behind the blog. I am wife to Eric, mom to Trevor (11), Anna (8), and Grady (6).

I grew up on my grandfather's farm in Lower Alloway's Creek. There I learned at a young age how to work: hoe a field of squash, pick, pack and deliver produce, drive tractor. We worked a lot of hay and straw. I spent my summers throwing bales in the hot sweaty hay maul and I loved it. Maybe not loved every hot sticky scratchy moment but I enjoyed being outside setting out to bale a field and in the end having a barn full of hay to show for it. I will be forever grateful to my Grandad for taking the time to train me up to not shy away from farm work.

When I entered high school I met this dreamy guy with long curly hair who would later become my husband. He was a farm kid and after dating him for almost 2 years I asked if I could get a job on their farm. I loved working for Grandad, but the work was sporadic and I needed a good steady summer job.

There was a big  difference from working on my Grandad's sleepy farm which was a slower pace (think water breaks where you get Grandad talking and the story lasts 40 minutes) to a bustling farm with 20 employees, trying to grow, pick and pack 170 acres of fresh produce to support a growing family. It was intense and I loved it.  It was fast paced and it was fun!

When Eric asked me to marry him (I said YES!) I was a student at Rowan University studying elementary education and he was at the University of Delaware studying Bioresources Engineering. It was at that time we decided we wanted to be full time farmers. We wanted to have a family and raise our kids on a farm. Every time we discussed the other possibilities, Eric getting a engineering job, myself teaching, we just didn't see that in our future. We dreamed of working together, working the land, and growing the best fresh produce. We were so excited about our future together on the farm, it was tempting to drop out of college, but with great persistence we finished our degrees while getting married in my sophomore year.


In 2007, we had an opportunity to build a house on the farm while expecting our third child and in need of a bigger house. We had only been living five miles away, so you might think it would not be that big of a difference, but this move transformed our relationship with the farm and with each other. Living on the farm means you're never far from work, for better or for worse. This is not just a job anymore, it's our life. It also means that we're never far from the ones we love. The kids can run out to see what Dad is doing in the field. Dad can stop in and steal a kiss from Mom when he likes. I am so blessed to have the opportunity to live this life and I wouldn't trade it for anything.


Thank you for letting us be your farmers.